Controlling Images in Word 2010

For many years now Microsoft has made it hard for new users to control inserted images in their documents.
Unfortunately, Word 2010 is no exception and, by default, images are inserted into a new Word document as inline images. This means that they cannot be moved or easily positioned on the page without you needing to first change the image’s wrap settings.
This leaves hapless new users with absolutely no clue that this feature is available or needed much less where to find and set it.
To change the way that images are inserted into Microsoft Word documents to make it a one-step process that never needs to be tweaked, in Word 2010 choose File > Options and select the Advanced tab. Locate the Cut, Copy and Paste options and set the Insert/Paste Pictures As setting to Square, Tight, Behind Text, In Front Of Text, Through or Top And Bottom - in fact anything other than the default Inline With Text.
Once you’ve done this, when you insert an image into a document it will be inserted with the setting that you determined. This makes it easy to move the image around the screen and position it exactly where you want it to be.
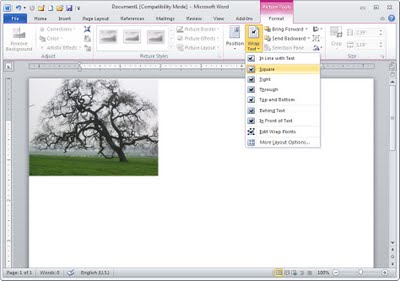
If you have images in your document and if you need to change their wrapping so that you can work with them, click the image, click Picture Tools > Format and from the Wrap Text dropdown list, select Square or another setting (other than Inline with Text).
Microsoft, this default setting earns you a score of -10 it’s not the typically required setting and it doesn’t make good sense as a default.


0 Comments:
Post a Comment
Please feel free to add your comment here. Thank you!
Subscribe to Post Comments [Atom]
<< Home