Articles | Photoshop blog | Photography blog | about me | e-mail

Helen Bradley - MS Office Tips, Tricks & Tutorials

Wednesday, April 22, 2009

Word 2003 - Disable the Insert key

If you still use Word 2003 or earlier you're at risk of Word suddenly taking off and gobbling up text as you type. The problem is that the Insert key toggles insert/overtype mode and if you press it by accident you can end up in overtype mode so everything you type just replaces something else! Yikes it can be frustrating.

Now, Microsoft solved the problem in Word 2007 by disabling the Insert key so it no longer switches into overtype mode any more. That annoys some folks so I wrote a post here about fixing it so it goes back to its old behaviour. But this post is for hapless Word 2003 users and I'll show you how to disable the Insert key so it won't switch into overtype mode. The solution only affects Word so your other programs work as expected.

To disable your Insert key, choose Tools > Customize and click the Keyboard button. Scroll to find the All Commands category and scroll the Commands list to locate the Cancel option. In the Press new shortcut key box click once and then press the Insert key. Click Assign and then Close. This assigns the Insert key to the Cancel command so that it no longer operates OverType mode.

If you ever need to use OverType mode, double click the OVR indicator in the status bar to enable or disable it.

Labels: , , ,

Add to Technorati Favorites

Thursday, April 16, 2009

Send to PowerPoint missing? Not really!


In Word 2003 you could create an outline in Word and then send it to PowerPoint where it would be converted to a PowerPoint slide show. Level 1 became the slide title and level 2 the first level bullet points and so on.

I hear a lot of grumbling that this feature has been removed from Office 2007 – not so! It just isn’t quite where you expect it to be. In fact, you have a few options in PowerPoint 2007 and Word 2007.

Option 1
You can add the Send to PowerPoint button to the Word 2007 Quick Access toolbar by clicking the Office button and choose Word Options > Customize and from the Commands not in Ribbon collection choose the Send to Microsoft Office PowerPoint option and click Add to add it and then Ok. Now you can click it to send the outline file to PowerPoint.

Option 2
You can also approach the task from PowerPoint 2007 which is really the better option. One alternative is to open the Word outline file in PowerPoint and the slides will be automatically created for you. To do this click the Office button and choose Open and from the Files of type list choose All Files so you can see and open your Word file.

Option 3
This is my fave!

Open PowerPoint 2007 with a new slide show and make sure your Word 2007 outline file is closed.

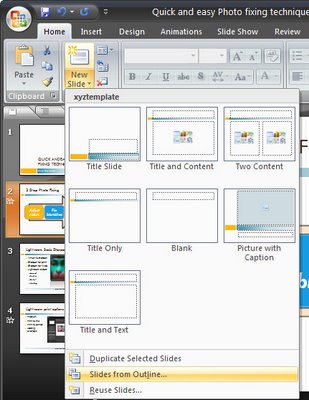
Choose the Home tab on the Ribbon and click the little arrow on the New Slide button. This opens a menu which includes the option Slides from Outline – select this and open your Word 2007 outline file. The slides are automatically created for you.

So, the option to Send to PowerPoint is not there in Word 2007 but you have so many more ways to complete the task now.

Labels: , , , ,

Add to Technorati Favorites

Thursday, April 9, 2009

Cool Word 2003 and 2007 Breakout Boxes


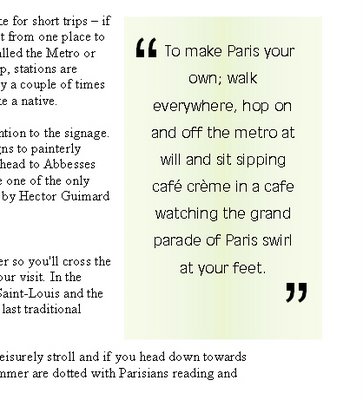
Breakout boxes or pull quotes are a great way to add visual variety to a very text heavy document. Even if you don't have images you can use you can still add some color and interest to the page. To do this, you will need some text to use – ideally it will be an interesting quote or sentence or two from the document itself. You will copy this so it appears in the correct position in the text but so it is also a feature element on the page.

Create a textbox
Start by selecting and copying the text. Click outside the text so it is no longer selected and choose Insert > Text box and draw a textbox on the page. Click inside it and choose Edit > Paste to paste in the text on the clipboard.

Format the text
Text in a breakout box looks better if it is formatted differently to the surrounding document, for example you may want to center it, change the font and adjust the line spacing to double line spacing so that the text looks very different.

Format the text box
You can add a colored background behind the textbox by selecting the textbox and choose Format > Textbox and from the Colors and Lines tab select a Fill Color for the textbox. To remove the border line, choose Line Color > No Line (or choose a line option that you like), and click Ok.

Add quote marks
Adding an oversize pair of quotation marks helps delineate the breakout box or pull quote from the remainder of the document. In this instance it’s best to place the oversize quotation marks each in a separate textbox, format them so they are very large, set the textbox so that the fill color is set to No Fill and the line color to No Line and then drag it into position over the textbox that contains the breakout text.

Set the wrapping
If you set this small textbox’s wrapping to in front of text the text will not be forced to wrap around it and the textbox with the pull quote will control the wrapping not the double quote marks. Format the double quote marks in an interesting font that has an attractive shape for the quotes so that you create an interesting effect.

Labels: , , , , ,

Add to Technorati Favorites

Wednesday, April 8, 2009

Accessing the Clipboard contents in Word 2007


In previous incantations of Word it was fairly easy to see, and therefore to know, that the Office clipboard contains more than just the most recently copied or cut item. In Word 2007 this is not the case and you need to know where the clipboard is and to understand that it contains much more of your document history than you might think it does.

How it works is that it retains everything you copy and cut to the clipboard during the current session. As you copy or cut something, all the other items are moved further down the stack leaving the current item at the top. This is the item that is pasted in if you choose the Paste option. However, you can paste anything that is on the clipboard, provided you can find it.

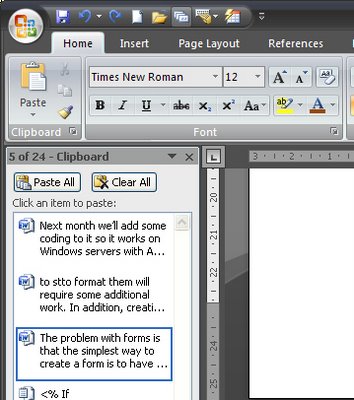
In Word 2007 click the Home tab and, below the Paste button you will see a small entry for the Clipboard and a flyout indicator. Click it and the clipboard will appear and all the items in it will be listed. The clipboard stores up to 24 items and as each additional one is added the one at the bottom is lost. You can paste any of the items that display in the list into your document by just clicking on it.

So, next time you know you cut or copied something a while ago and you need it back, check the Clipboard, chances are it's there waiting.

Labels: , ,

Add to Technorati Favorites

Monday, April 6, 2009

Excel - calculating workdays with Networkdays


Excel has lots of very cool functions for doing all sorts of calculations. One of these is the NETWORKDAYS function.

You can use it to calculate the number of days between two dates taking into account holidays.

Start by placing the dates for the holidays in a range of cells across a row or down a column. Select this range and name it holidays using Insert > Name > Define.

The function calculates the number of workdays between two dates so place one, for now, in cell A1 and the other in A2. This function will calculate the days between the dates in cells A1 and A2 taking into account the holidays listed in the range called Holidays:

=NETWORKDAYS(A1,A2,Holidays)

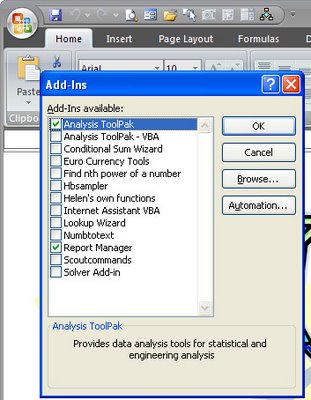
If the NETWORKDAYS function returns an error make sure that you have the Analysis Toolpak installed as this function is stored in this toolpak. To install it in Excel 2003 choose Tools > Add-ins and enable its checkbox. In Excel 2007, click the Microsoft Office Button > Excel Options > Add-Ins and from the Manage list choose Excel Add-ins and click Go. In the Add-Ins Available list enable the Analysis ToolPak checkbox and click OK.

Labels: , , , , ,

Add to Technorati Favorites

Friday, April 3, 2009

PowerPoint - Create a Custom Show


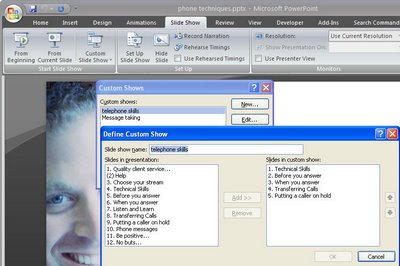
Did you know that one PowerPoint presentation can be reused over and over again, in different configurations for all sorts of purposes. A large presentation can be broken up into shorter presentations and a regular presesntation can be reworked to be used as a Kiosk presentation at a tradeshow. You can do all this without creating additional files or duplicating slides which means that you can make changes to all the shows in one step.

Create the new show
1 To create a new custom show from an existing presentation, open the presentation and, in PowerPoint 2003, choose Slideshow > Custom Shows and in PowerPowerPoint 2007 click the Slide Show tab > Custom Slide Show. Click the New button and type a name for your custom show – use a name that identifies what it contains or the audience you will present it to.

Add the slides
2 From the Slides In Presentation list click each slide that you want to include in the shortened or custom slideshow and click Add to add it to the slides in custom show dialog.

Organise the slides
3 Use the arrow buttons by the Slides In Custom Show pane to rearrange the slides to a different arrangement in the custom show if desired. When you are done, click Ok to create your custom show.

Selecting a custom show
4 If you click Close you’ll be returned to your original presentation but you can select the custom show at any time by choosing Slideshow > Custom Shows, select the custom show by name and click Show. Now if you run the slide show you'll see the slides in the selected custom show only and in the desired order.

Customising the show
5 To customize the setup for your custom show, choose Slide Show > Set Up Show. Select the Custom Show option in the Show Slides area and click your show name in the dropdown list. Select whether the show will be given by a speaker, at a kiosk, or browsed by an individual and then set the show options. Click Ok to confirm your choice.

Things to watch out for
There are a couple things to be aware of when you are using custom shows. If you have the custom show selected, while you can still work on other slides - even those not in the custom show - if you choose to view the show you’ll see only slides in the custom show and not necessarily those you've been working on.

To view the entire show, choose Slide Show > Set Up Show (in PowerPoint 2007 choose Slide Show > Set Up Slide Show), and select All from the Show Slides list. Now when you run your presentation you’ll see all the slides in your presentation.

Labels: , ,

Add to Technorati Favorites