Articles | Photoshop blog | Photography blog | about me | e-mail

Helen Bradley - MS Office Tips, Tricks & Tutorials

Thursday, February 18, 2010

Word 2007 - Picture styles

Word 2007 comes with a range of styles you can use when inserting images into your document.

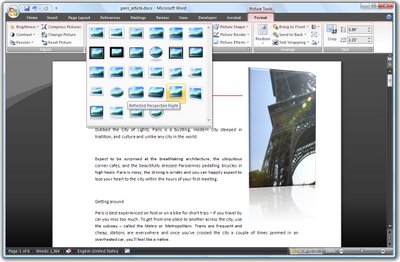
To see them at work, insert a picture into your document, click the image and choose Picture Tools > Format on the Ribbon.

The Picture Styles are formats you can apply to your image and they include some very attractive looking options.

Once you’ve selected a picture style you can adjust things like the Effects which are attached to it.

For example, you can create a picture reflection by selecting the picture and then choose the Picture Effects > Reflection option to create a reflected edge.

You can also recolor the picture border if desired by using the Picture Border option. If you have a picture inserted in a document and formatted the way you like it but determine that you don’t like the picture and want to replace it, choose Picture Tools > Format and click the Change Picture option and choose an alternate picture to use. The format will remain and only the picture itself will change.

Labels: , , , ,

Add to Technorati Favorites

Thursday, February 11, 2010

Word 2007 Quick Tables

New to Word 2007 is the Quick Tables feature.

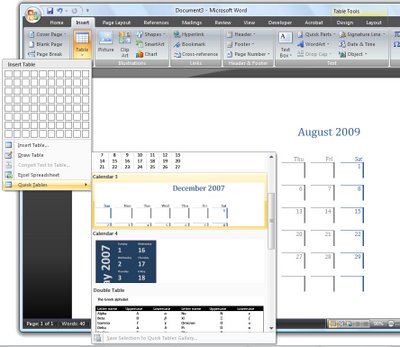
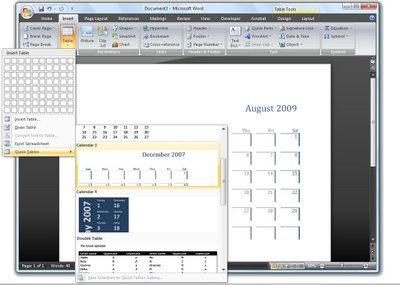
To see what is available, click the Insert tab, choose Table > Quick Tables and choose from a range of preconfigured tables such as calendars and tables with sub headings and other features.

Once the table is inserted into the document, you can replace the text in it with your own text such as the dates for your desired calendar month.

Most of the elements that you're used to selecting from the Tables menu in previous versions of Word can be found on the Tables Tools > Layout tab and these include the ability to repeat header rows at the top of the table and options for adjusting the text direction and inserting and deleting rows.

Once you have a table formatted in the way you want it to look you can add that particular format to the Quick Tables Gallery so you can use it anytime.

To do this, click inside the table and choose Table Tools > Layout tab. Click Select > Select Table so the entire table is selected. Now, from the Ribbon, choose Insert > Table and click on the Quick Tables option.

Choose Save Selection to Quick Tables Gallery and the Create New Building Block dialog will appear. Complete it as you would for a regular Building block element with the exception that this time, leave the Gallery option set to Tables so the table will appears in the Quick Tables Gallery.

Click Ok when you're done. In future, your custom designed table will be selectable from the Quick Tables Gallery.

Labels: , , ,

Add to Technorati Favorites

Thursday, February 4, 2010

Tables in Word 2007

The table options in Word 2007 allow you to create quite sophisticated tables more easily than you’ve been able to in the past.

Click the Insert tab and click the Table button and drag over the number of cells you want for your table.

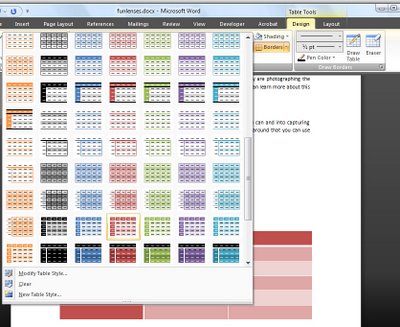
With the table selected, choose Table Tools > Design tab and choose a Table Style from the dropdown list.

Many of the styles are linked to theme colors so you can create a table with an attractive style which like other Word objects changes color to match the theme when it changes.

When you have a table style selected you can configure other options for it by, for example, selecting the Banded Rows checkbox in the Table Style Options group and adjusting the look of the first and last columns and header row using the checkboxes.

Labels: , , , ,

Add to Technorati Favorites

Thursday, January 28, 2010

Word 2007 - Formatting with Styles

Microsoft Word 2007 provides styles that you can use to format your documents.

These make it easier for you to change the look of a document very quickly by combining styles with the new Office 2007 themes.

To get started with styles, with a document open on the screen click the Home tab and choose the Change Styles button.

Here you can select a Style Set for your document, for example choose Distinctive or Elegant, Fancy or Formal depending on what you want your document to look like.

Once you have selected a Style Set, the Styles group on the Home tab will display styles from that set.

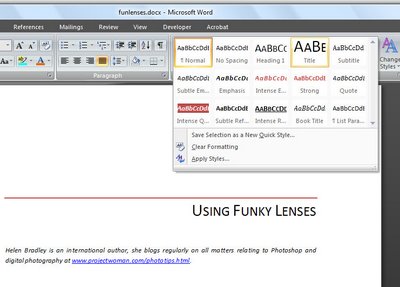
To apply a style to text, select the text, for example a title, then in the dropdown Style list and hold your mouse pointer over one of the styles to see how it would look if applied to that text. Select the style that you want to use and click it to apply it.

You can also add your own choice of formats as a selectable style. For example, format a piece of text so it looks the way you want your style to appear and select this text. Open the Style list and choose Save Selection as New Quick Style.

Give the style a name, click Modify to change any of its characteristics and click Ok to save it as a Quick Style. This style now appears in the Style list and you can select it to apply to text in your document at any time.

Labels: , , ,

Add to Technorati Favorites

Thursday, January 21, 2010

Word 2007: Drawing in documents

One technique that has changed with Word 2007 is drawing in documents.

Instead of having a Drawing toolbar you now select shapes from the Shapes dropdown list on the Insert tab.

From this list you can select shapes such as lines and all the AutoShapes that you are used to using in earlier versions.

To create a drawing, for example, you can select and insert the shapes that make up the drawing and then format them using the Drawing Tools > Format options on the Ribbon.

Many of the color options that are available are connected to the theme colors so, provided you use a theme color in your drawn shapes, the colors will change automatically later if a different theme is applied to the document so the drawing stays consistent with the remainder of the document.

Find the shape formatting tools on the Drawing Tools > Format tab on the Ribbon.

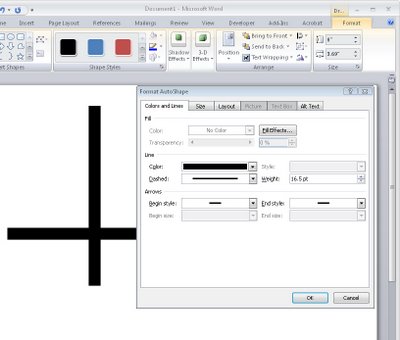
What is missing in Word 2007 is the ability to right click a shape and have the format AutoShape dialog appear as it does in Excel and PowerPoint.

The Format tab and the Format Object dialog in Word offer less features than are available in the new graphics engine in the other applications.

Labels: , , , , ,

Add to Technorati Favorites

Thursday, January 14, 2010

Select a table cell contents in Word 2007

image

Confession time. I had a picture in a table cell in Word and try as I might I couldn’t get the little black angled cursor to appear so I could select the cell’s contents. Frustrating – yep, I’d say so.

image

Nope – wrong arrow, the image is so close to the table cell it’s almost impossible to get the cell select arrow to appear.


imageThis is what it should  look like. 

Then I remembered the new feature in Word 2007 – it’s on the Table Tools >Layout tab (so you have to have a table and click in it to see this option). On the far left is the Select button – new to Word 2007. Click it and you can select what to select. Oh! let’s back up a bit  here - it would be a good idea to click in the cell you want to select before you begin - forgot that bit.

Using this you can select a cell then right click and, as I did, choose Copy to copy its contents. Don't be fooled by the fact that not everything in the cell looks like it is selected - just trust that it is.

There are other options there that include Select Row, Select Column, Select Table – much easier than trying to juggle those little arrows when they just won’t appear.

Labels: , , , , ,

Add to Technorati Favorites

Tuesday, December 1, 2009

Word 2007 - Add a Date Picker control

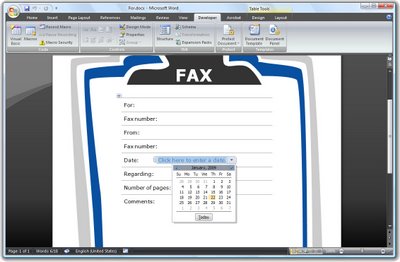
Word 2007 has a cool Date Picker control you can use to insert a date into a document.

To insert one into your document first display the Developer tab by selecting the Office button, click Word Options and from the Popular category choose the Show Developer tab in the Ribbon option.

Now click the Developer tab and, in the Controls area you'll find entries for the Building Block Gallery and for elements such as a Date Picker and a Text Box which you can use in your documents.

Select Design Mode, click the Date Picker control to add it and then click Design Mode again to exit that mode.

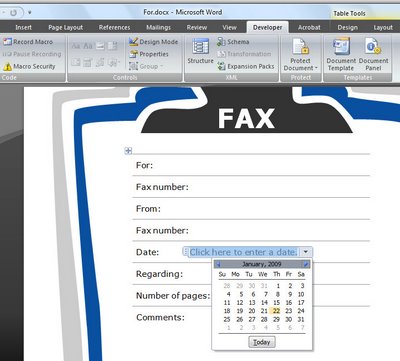
The user will see a Click here to enter a date option and, when they click the content control, a dropdown date picker will appear allowing them to select a date to insert into the document.

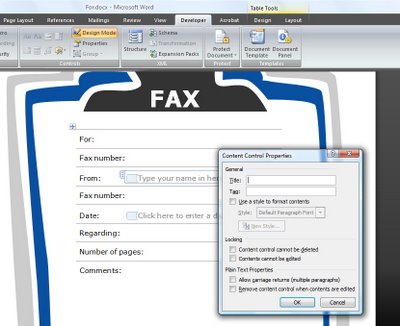
To ensure the date is formatted in a particular way, with Design Mode enabled click the Date Picker and choose Properties from the Ribbon. From the Properties dialog select a date format to use from the list.

You can use content controls like these to create memo and fax cover sheets complete with prompts to your user as to the details required.

Labels: , , , ,

Add to Technorati Favorites

Tuesday, November 24, 2009

Word 2007: Make your own Click and Type controls

Word 2007's new Content Controls let you do some pretty snazzy things in your Word documents.

You will have worked with Word's own controls when you add a cover page or header and footer using the Insert tab options in Word 2007. In this case you may have noticed that, if your document already has a title configured in the document properties, the title appears automatically on the cover page and in the header.

Alternatively, if it doesn't have a title, when you double click the Title area and type one, any other object in the document that includes a title will be updated automatically. This behavior occurs because the document information is inserted using content containers which are linked to the document properties.

You can take advantage of this behavior in your own designs and you can create and use unlinked content containers to prompt for details to be inserted in your own documents.

To see how content containers work you’ll need to display the Developer tab which you can do by selecting the Office button, click Word Options and from the Popular category choose the Show Developer tab in the Ribbon option.

Click the Developer tab and, in the Controls area you'll find entries for the Building Block Gallery and for elements such as a Date Picker and a Text Box which you can use in your documents.

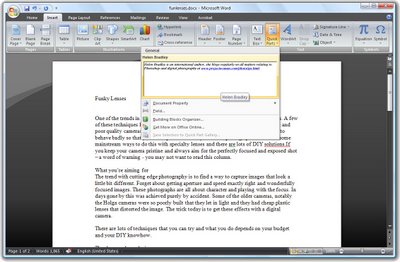
So, for example, to prompt a user to insert an entry from the Quick Part Gallery, click where you want the Quick Part Gallery entry to appear. Click the Developer tab and click the Design Mode button so you are in design mode.

Now click the Building Block Gallery button. This inserts a small content container with the words [Choose a building block] as the prompt. Exit Design Mode by clicking Design Mode button once again and you will see that the document contains a clickable link in this position prompting the user to choose a building block.

In practice, all the user needs to do is to click on the Choose a building block link to show the dropdown list and they can then select the building block to insert at this position in the document.

You can also provide a link that the user clicks on to type custom text. To do this, check you're in Design Mode and select the Text button from the Controls group. Between the markers type the text describing the content to be inserted in this position.

To test this, deselect Design Mode and click the element to see it highlighted and type the text prompted for. The text you type appears in line with regular text in the document and can be formatted by right clicking on the text and apply a format to it.

Note, however, that the entire content control is formatted at the one time and individual letters and words cannot be formatted independently of the others.

Labels: , , ,

Add to Technorati Favorites

Tuesday, November 3, 2009

Word 2007 - Boilerplate paragraphs

One typical use for Microsoft Word is in offices where documents and letters are created by assembling a series of standard paragraphs from a range of alternatives.

In the past Microsoft Word included the AutoText and AutoCorrect features and, like many users, you may have adapted AutoCorrect to use in creating boilerplate documents.

Some other users tweaked the AutoText tool so they could use it to insert content, such as graphics and text.

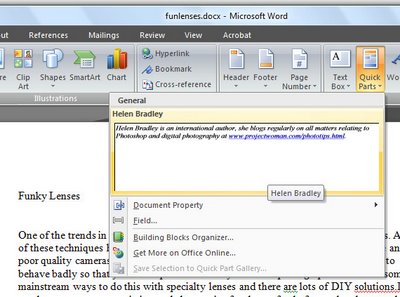
The AutoText tool no longer appears in Word 2007 and it has been replaced by a Quick Parts Gallery which makes saving, organizing and assembling documents from stored paragraphs, aka Building Blocks, much easier to achieve.

Find the Quick Parts tool on the Insert tab and click the down pointing arrow to open the Quick Parts Gallery.

Here you have a number of options including Document Property which lets you insert some of the common document properties into your document by clicking on the one to insert.

The Field option lets you insert fields much as you could in earlier versions of Microsoft Word.

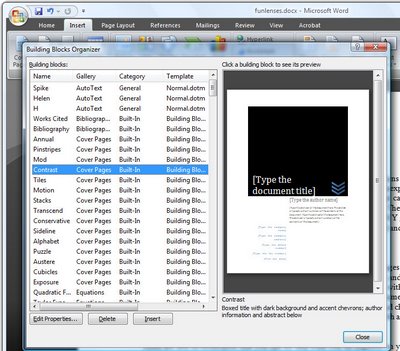
The Building Blocks Organizer is the newest feature and this is a repository of text blocks which you can add to your Word documents. These Building Blocks can be sorted by Name, Gallery or Category. Some of the Building Blocks come built-in to Microsoft Word and others are legacy AutoText entries from earlier installations of Microsoft Word.

You can insert a Building Block into a document by selecting the entry in the list and click Insert.

Labels: , , , ,

Add to Technorati Favorites

Saturday, October 17, 2009

Word 2007 - Instant Document Elements

Hand in hand with the new Building Blocks tools in Word 2007 are the new smart document elements created using content controls.

These elements allow you to instantly create headers, footers, text boxes and cover pages for your Word documents.

To see how these work, select the Insert tab and select the Cover Page dropdown list. From here you can select a sample cover page to use for your document.

If you select one such as Exposure a new cover page will appear in your document. This particular one includes an image and space in which to type the document abstract, the year and document title as well as your company name, etc.

You can select and delete any of these elements that you don’t want to use on your cover. Alternately, click on the elements you do want to include and type the information prompted for.

To replace the photograph on the cover page, click it to select it, right click and choose Format AutoShape > Colors & Lines tab and click the Fill Effects button. Select the Picture tab and click Select Picture to choose a replacement image.

Once you've selected the replacement image, enable the Lock Picture Aspect Ratio checkbox and click Ok twice. The original image will be replaced by the one you chose.

If you later change your mind and choose an alternative Cover Page, the text you've typed will, where it is appropriate, appear in the alternate cover page and the original page will be removed automatically.

Headers and Footers
Other elements which work similarly to the cover page are to be found also on the Insert tab and these include the Header and Footer and Text Box. To add a header to your document, for example, select the Header option and choose the header to use.

It makes good sense to choose the same style header as you used for the cover page as these are designed to look good together, although this is not a requirement and you can choose any header you like.

Similarly, you can add a footer by clicking the Footer button and choose a footer to add to the document.

Text boxes
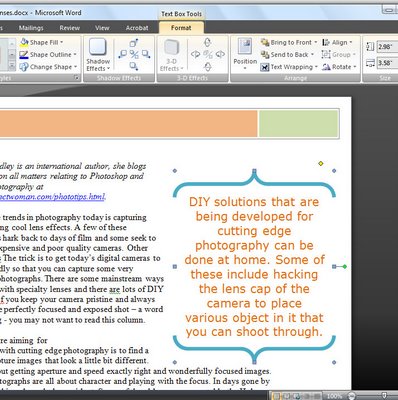
The Text Box tool lets you add a formatted text box which contains prompts as to where you should insert your content. In this case, select a text box style that suits the type of text you want to insert such as a breakout quote or a sidebar.

Any element such as Header content or a Text Box can be reformatted by right clicking its edge and choose Format AutoShape or Borders and Shading, or whatever prompt suggests that it will let you format that particular element – what you see in the menu will depend on the element you have selected.

For example, you can change the fill color of a Text Box and, if you change it to a fill color which is a theme color, the Text Box color will update later on if you change the document theme.

To change the theme, select the Page Layout tab and choose an alternate option from the Themes list. By holding your mouse over a theme you can preview its effect on the document underneath, select the theme you want to use. To change the font used, select the Theme Fonts option to right of the Themes list and choose an alternate font combination.

Labels: , , , ,

Add to Technorati Favorites

Saturday, October 10, 2009

Word 2007 DIY Quick Parts

Quick Parts in Word 2007 is the new replacement for AutoCorrect and AutoText from earlier versions of Word.

To add your own text to the Quick Parts gallery, type the paragraph or open a document which contains it and select it.

Click the Quick Parts button and choose Save Selection to Quick Part Gallery and, when the Create New Building Block dialog appears, type a name for the Building Block.

This will be the name you'll use to identify it in the list so make it self-explanatory of what the Quick Part contains.

Select the Gallery to add it to, in most cases this will be the Quick Parts Gallery.

Select a Category from the list or click the Create New Category option to create your own subcategory of the Quick Parts Gallery. By creating sub categories you can organize your Quick Part entries so that they are easier to find.

Type a description of the Quick Part, if one is needed to identify it, and, from the Save In list, choose buildingblocks.dotx which is the default setting.

From the options dropdown list you can select to Insert Content Only, or insert the content in its own paragraph or its own page depending on how the content should be used. Click Ok when you are done.

In future you can insert the Quick Part into a document by clicking the Quick Part button and then select it from the dropdown list.

If it does not appear in the list, click the Building Blocks Organizer and select the Building Block by name.

You can locate building blocks in the organizer by sorting on the Gallery column and locate the Quick Part area which is where your building blocks will appear. Click the one to insert and click Insert.

Labels: , , , ,

Add to Technorati Favorites

Thursday, August 13, 2009

Word 2007 – Sort Words, Paragraphs and Table Cells


Word 2007 finally fixed a huge problem that existed in earlier versions - it looked like there was no way to sort data in a list.

This wasn't the case - you used the table sort feature but it was far from being self evident.

Now Word 2007 uses the same tool it just puts it in a smart place.

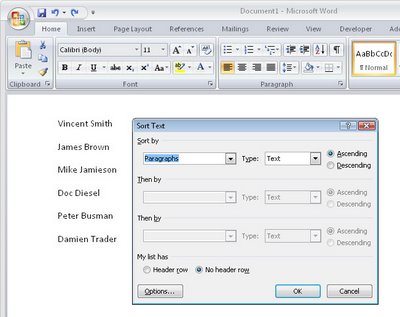
To sort a list or series of words or paragraphs, select the text.

From the Ribbon, click the Home button and click the Sort button in the Paragraph group.

Choose Paragraph to sort on the first word and click Ok to sort the data in order.

If you're using an earlier version of Word, then visit this post to see how to sort in Word 2003 and earlier:

Sorting a Word list
http://www.projectwoman.com/labels/Table%20Sort.html

Labels: , , , , ,

Add to Technorati Favorites

Friday, July 17, 2009

Word 2007 - instant tables


New to Word 2007 is its Quick Tables feature which provides custom formatted tables for inserting in a document. To see the tables available click the Insert tab and choose Table > Quick Tables. The preconfigured tables include calendars and tables with sub headings and other features already formatted. Click a table to insert it and, once in the document replace the text in the table with your own text such as the dates for your desired calendar month.

These tables are a quick way to create some really great looking tables, one wonders though why no one made the calendar options just a little bit smarter so they automatically enter the desired month and days. Just a thought Microsoft!

Labels: , , ,

Add to Technorati Favorites

Wednesday, July 8, 2009

Word 2007 - Update Normal Style

The Normal style is applied to text by default if no other style is applied.

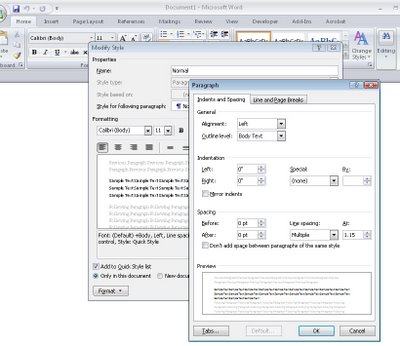
If the Normal style for any of the style sets is not to your liking, select it in the style list, right click and choose Modify.

You can now alter the style, for example you can reduce the inter-paragraph spacing by clicking Format > Paragraph and reduce the Spacing After value.

Click Ok and then, to apply this change to all new documents based on this template, select the New Documents Based on This Template option and click Ok.

By configuring the styles to suit your needs you can quickly format your documents to a consistent look without having to make all the format changes individually.

Labels: , , ,

Add to Technorati Favorites

Thursday, June 18, 2009

Word 2007 - smart date entry


Word 2007 has some totally cool new tools for entering data in your documents. Trouble is they are hidden so most folks don't know they are there.

To start, display the Developer tab by clicking the Office button > Word Options > Popular > Show Developer tab in the Ribbon.

Now click the Developer tab and, in the Controls area you'll find entries for a range of tools including the Date Picker. To insert the date picker into your document click Design Mode and then click the Date Picker button. Click Design Mode again to exit that mode.

Now your user will see a Click here to enter a date option and, when they click the content control, a dropdown date picker will appear allowing them to select a date to insert into the document.

To ensure the date is formatted in a particular way return to the Developer tab, click Design Mode and click the Date Picker in the document. Click the Properties button on the Ribbon and from the Properties dialog select a date format to use. Make sure to deselect Design Mode before you return to your document.

Labels: , , ,

Add to Technorati Favorites

Monday, June 15, 2009

Word 2007 working with boilerplate text


One typical use for Microsoft Word is in offices where documents and letters are created by assembling a series of standard paragraphs from a range of alternatives. In the past Microsoft Word included the AutoText and AutoCorrect features and, like many users, you may have adapted AutoCorrect to use in creating boilerplate documents. Some other users tweaked the AutoText tool so they could use it to insert content, such as graphics and text.

The AutoText tool no longer appears in Word 2007 and it has been replaced by a Quick Parts Gallery which makes saving, organizing and assembling documents from stored paragraphs, aka Building Blocks, much easier to achieve.

Boilerplate text with Quick Parts
Find the Quick Parts tool on the Insert tab and click the down pointing arrow to open the Quick Parts Gallery. Here you have a number of options including Document Property which lets you insert some of the common document properties into your document by clicking on the one to insert. The Field option lets you insert fields much as you could in earlier versions of Microsoft Word.

The Building Blocks Organizer is the newest feature and this is a repository of text blocks which you can add to your Word documents. These Building Blocks can be sorted by Name, Gallery or Category. Some of the Building Blocks come built-in to Microsoft Word and others are legacy AutoText entries from earlier installations of Microsoft Word. You can insert a Building Block into a document by selecting the entry in the list and click Insert.

Create you own entries
To add your own paragraphs to the gallery, type the paragraph or open a document which contains it and select it. Click the Quick Parts button and choose Save Selection to Quick Part Gallery and, when the Create New Building Block dialog appears, type a name for the Building Block. This will be the name you'll use to identify it in the list so make it self-explanatory of what the Quick Part contains. Select the Gallery to add it to, in most cases this will be the Quick Parts Gallery.

Select a Category from the list or click the Create New Category option to create your own subcategory of the Quick Parts Gallery. By creating sub categories you can organize your Quick Part entries so that they are easier to find. Type a description of the Quick Part, if one is needed to identify it, and, from the Save In list, choose buildingblocks.dotx which is the default setting. From the options dropdown list you can select to Insert Content Only, or insert the content in its own paragraph or its own page depending on how the content should be used. Click Ok when you are done.

In future you can insert the Quick Part into a document by clicking the Quick Part button and then select it from the dropdown list. If it does not appear in the list, click the Building Blocks Organizer and select the Building Block by name. You can locate building blocks in the organizer by sorting on the Gallery column and locate the Quick Part area which is where your building blocks will appear. Click the one to insert and click Insert.

Labels: , , ,

Add to Technorati Favorites

Monday, May 4, 2009

Word does Math - in tables!


Lots of folk do things like use Word for invoices simply because it's easy to do. When it comes to laying out data for an invoice a table makes a good choice as everything looks very neat.

It is also a good choice because, once your data is in place, you can get Word to do the calculations for you.

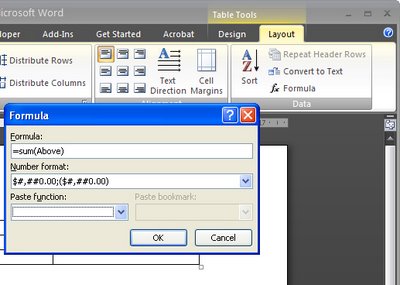
So, for example if a column contains a series of numbers that you want to add up, click in the blank cell at the bottom of the column of numbers and choose Table > Formula (in Word 2007 choose the Table Tools > Layout > Formula button). Make sure the formula reads =sum(above) and click Ok. Now the total is in place in the cell.

If you change the numbers in the cells above, you'll need to recalculate the formula. To do this, click in the cell containing the formula and press F9.

The Table Formula dialog also includes an option for formatting the numerical result so it looks the way you want it to - with numbers after the decimal point and even a leading $ or £ symbol.

Labels: , , , ,

Add to Technorati Favorites

Thursday, April 16, 2009

Send to PowerPoint missing? Not really!


In Word 2003 you could create an outline in Word and then send it to PowerPoint where it would be converted to a PowerPoint slide show. Level 1 became the slide title and level 2 the first level bullet points and so on.

I hear a lot of grumbling that this feature has been removed from Office 2007 – not so! It just isn’t quite where you expect it to be. In fact, you have a few options in PowerPoint 2007 and Word 2007.

Option 1
You can add the Send to PowerPoint button to the Word 2007 Quick Access toolbar by clicking the Office button and choose Word Options > Customize and from the Commands not in Ribbon collection choose the Send to Microsoft Office PowerPoint option and click Add to add it and then Ok. Now you can click it to send the outline file to PowerPoint.

Option 2
You can also approach the task from PowerPoint 2007 which is really the better option. One alternative is to open the Word outline file in PowerPoint and the slides will be automatically created for you. To do this click the Office button and choose Open and from the Files of type list choose All Files so you can see and open your Word file.

Option 3
This is my fave!

Open PowerPoint 2007 with a new slide show and make sure your Word 2007 outline file is closed.

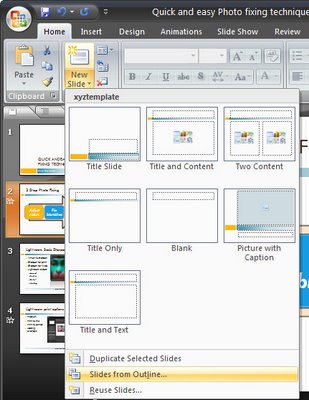
Choose the Home tab on the Ribbon and click the little arrow on the New Slide button. This opens a menu which includes the option Slides from Outline – select this and open your Word 2007 outline file. The slides are automatically created for you.

So, the option to Send to PowerPoint is not there in Word 2007 but you have so many more ways to complete the task now.

Labels: , , , ,

Add to Technorati Favorites

Thursday, April 9, 2009

Cool Word 2003 and 2007 Breakout Boxes


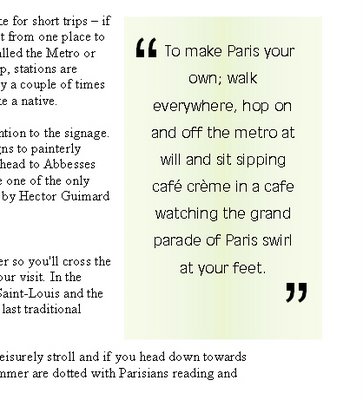
Breakout boxes or pull quotes are a great way to add visual variety to a very text heavy document. Even if you don't have images you can use you can still add some color and interest to the page. To do this, you will need some text to use – ideally it will be an interesting quote or sentence or two from the document itself. You will copy this so it appears in the correct position in the text but so it is also a feature element on the page.

Create a textbox
Start by selecting and copying the text. Click outside the text so it is no longer selected and choose Insert > Text box and draw a textbox on the page. Click inside it and choose Edit > Paste to paste in the text on the clipboard.

Format the text
Text in a breakout box looks better if it is formatted differently to the surrounding document, for example you may want to center it, change the font and adjust the line spacing to double line spacing so that the text looks very different.

Format the text box
You can add a colored background behind the textbox by selecting the textbox and choose Format > Textbox and from the Colors and Lines tab select a Fill Color for the textbox. To remove the border line, choose Line Color > No Line (or choose a line option that you like), and click Ok.

Add quote marks
Adding an oversize pair of quotation marks helps delineate the breakout box or pull quote from the remainder of the document. In this instance it’s best to place the oversize quotation marks each in a separate textbox, format them so they are very large, set the textbox so that the fill color is set to No Fill and the line color to No Line and then drag it into position over the textbox that contains the breakout text.

Set the wrapping
If you set this small textbox’s wrapping to in front of text the text will not be forced to wrap around it and the textbox with the pull quote will control the wrapping not the double quote marks. Format the double quote marks in an interesting font that has an attractive shape for the quotes so that you create an interesting effect.

Labels: , , , , ,

Add to Technorati Favorites

Wednesday, April 8, 2009

Accessing the Clipboard contents in Word 2007


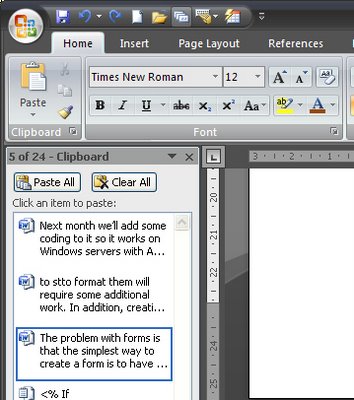
In previous incantations of Word it was fairly easy to see, and therefore to know, that the Office clipboard contains more than just the most recently copied or cut item. In Word 2007 this is not the case and you need to know where the clipboard is and to understand that it contains much more of your document history than you might think it does.

How it works is that it retains everything you copy and cut to the clipboard during the current session. As you copy or cut something, all the other items are moved further down the stack leaving the current item at the top. This is the item that is pasted in if you choose the Paste option. However, you can paste anything that is on the clipboard, provided you can find it.

In Word 2007 click the Home tab and, below the Paste button you will see a small entry for the Clipboard and a flyout indicator. Click it and the clipboard will appear and all the items in it will be listed. The clipboard stores up to 24 items and as each additional one is added the one at the bottom is lost. You can paste any of the items that display in the list into your document by just clicking on it.

So, next time you know you cut or copied something a while ago and you need it back, check the Clipboard, chances are it's there waiting.

Labels: , ,

Add to Technorati Favorites