Articles | Photoshop blog | Photography blog | about me | e-mail

Helen Bradley - MS Office Tips, Tricks & Tutorials

Wednesday, May 6, 2009

What cell is that? Identifying table cells in Word

When you're working with Word and doing math in your tables, you need to know the name of each table cell. In a largish table it can be difficult to keep track of everything.

Back in the days of Word 97 a macro shipped with Word that would tell you the name or cell reference of a given table cell. Here's how to take a step back in time and get that macro, install and use it, with later versions of Word:
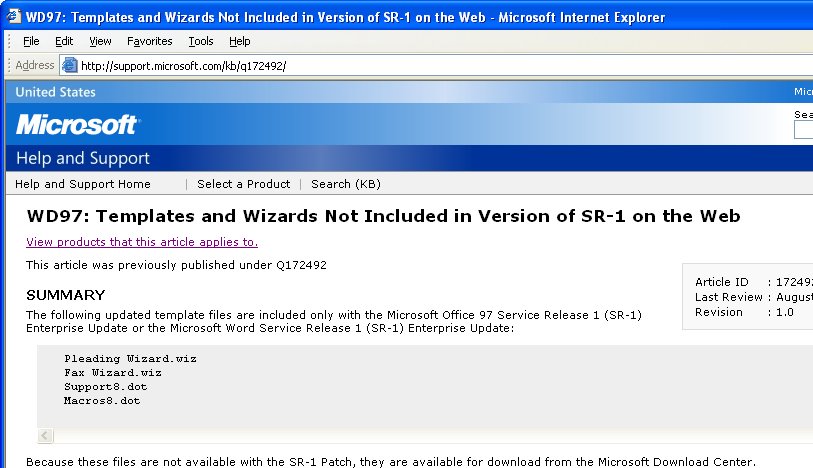

Visit http://support.microsoft.com/kb/q172492/ and download the file Wdtlupd.exe which is referred to on this page. This is a self-extracting zip file which includes various documents, the one we're using is not version specific. Run this file and select a location to save the extracted files into.
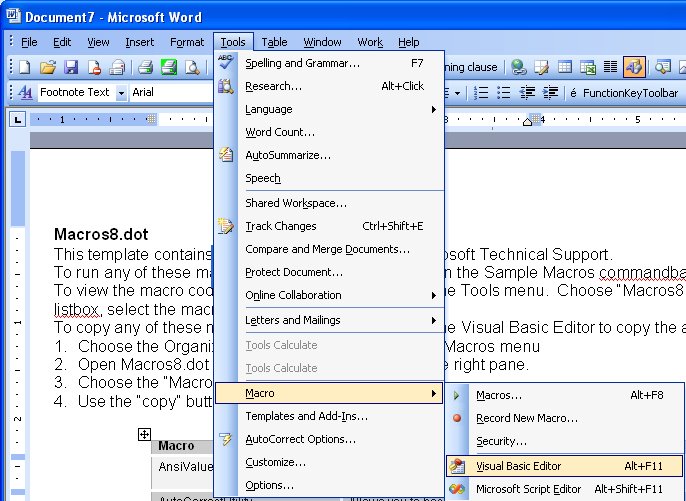

Open the folder containing the extracted files and double click the file macros8.dot to open it in your version of Word. If prompted to do so, click the Enable Macros button and the file will open automatically in Word. Now choose Tools, Macros, Visual Basic Editor if you are using Word 2003 or earlier. In Word 2007, make sure the Developer tab is visible (Office button > Word Options > Popular > Show Developer tab in the Ribbon). Choose Developer tab > Visual Basic.
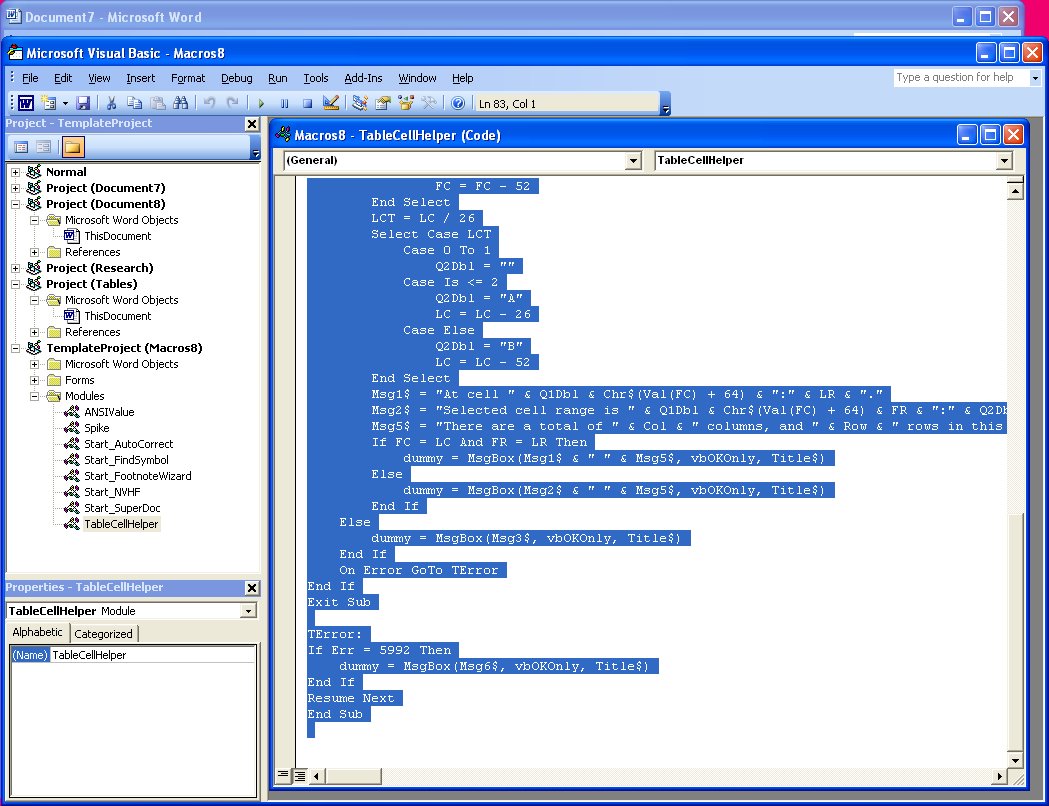

Locate the Macros8.dot file in the Project list on the left of the screen and click to open its Modules collection. Locate the module called TableCellHelper and double click it open the code window. Select the code and copy it by choosing Edit, Copy.
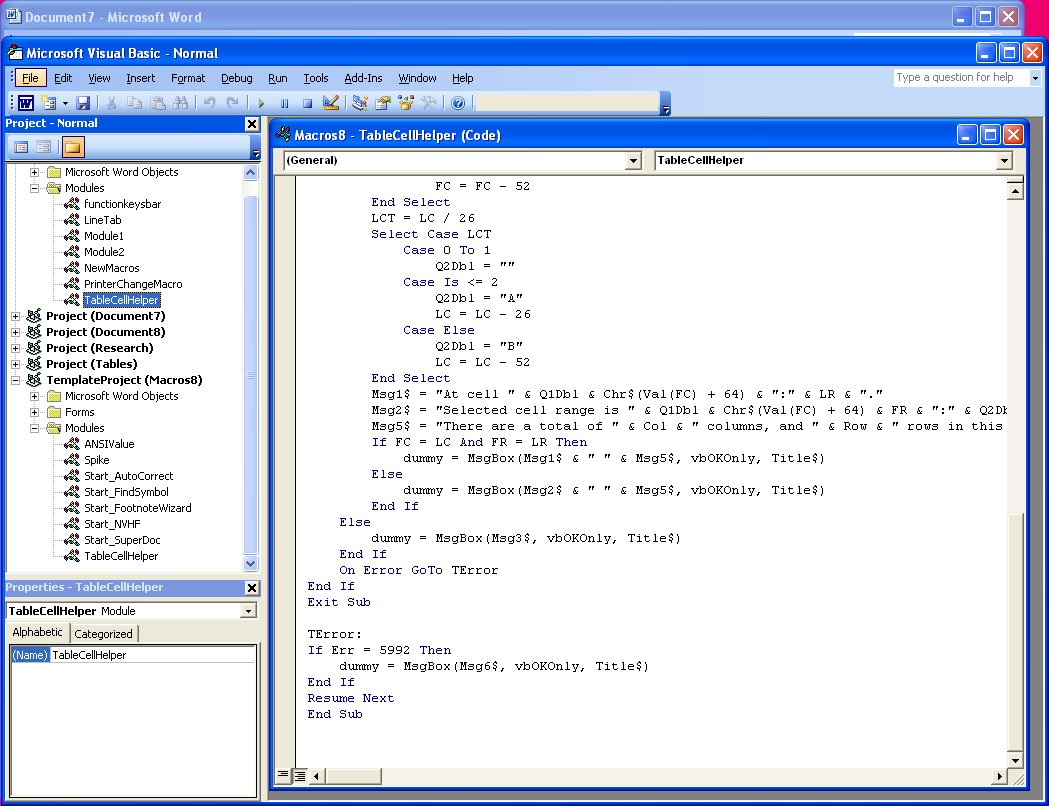

Locate the file Normal in the Project collection and click its Modules collection. Choose Insert, Module to add a new module, double click to open this new module and choose Edit, Paste to paste the copied code into the module. In the Properties area (choose View, Properties Window to display this if needed), alter the module name to TableCellHelper and, when you're done, close the Visual Basic editor and close the file created using Macros8.dot.
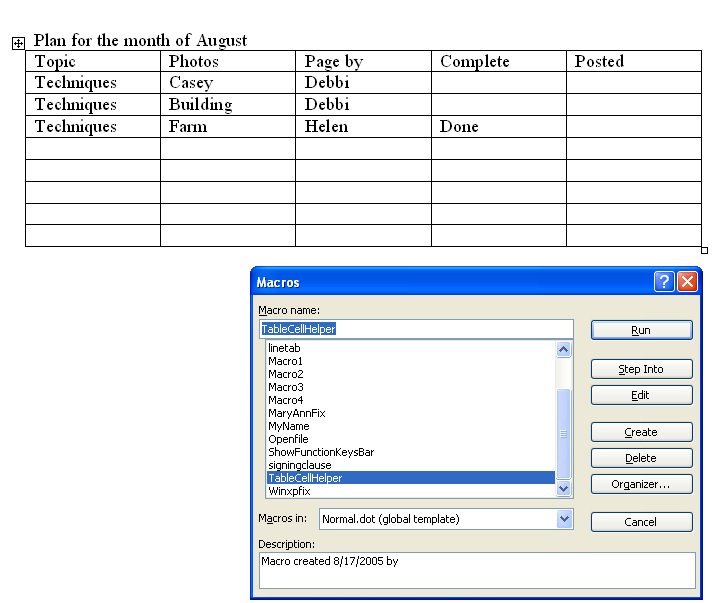

In Word 2003 and earlier, run the macro by clicking somewhere inside a table and choose Tools > Macro > Macros from the Macros in list choose Normal.dot and locate and run the macro called TableCellHelper. In Word 2007 click the Developer tab > Macros and from the Macros in list choose Normal.dotm and locate and run the macro called TableCellHelper. The macro will report the cell address and the total number of rows and columns in the table.
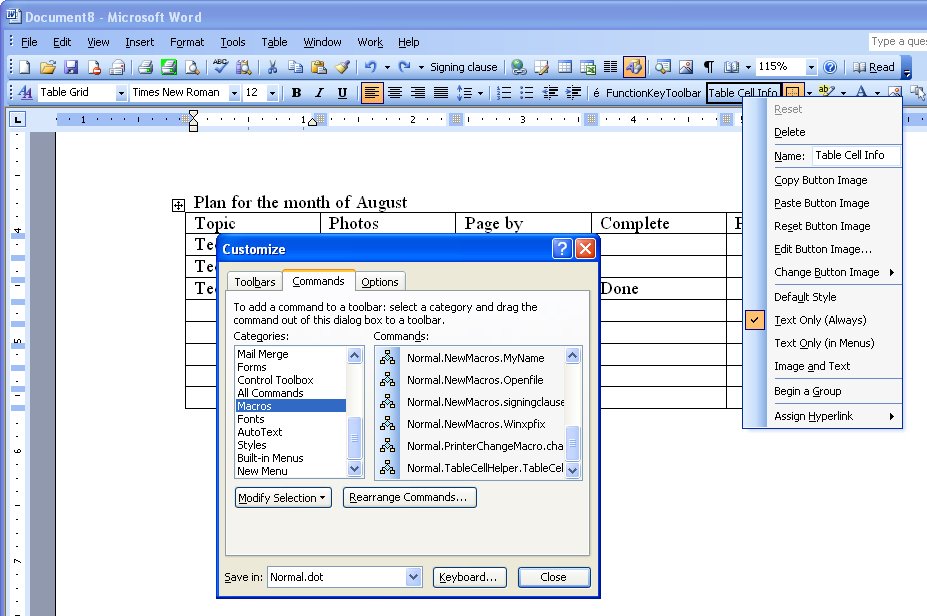

If you'd use this macro repeatedly, add it as a button to your Word 2003 (and earlier), toolbar by right clicking a toolbar and choose Customize. Click the Commands tab, select Macros from the Categories list and locate and drag the macro TableCellHelper on to the toolbar. Right click the new button and edit the name so it is shorter and more helpful. Close the Customize dialog.

Labels: , , , , , , ,

Add to Technorati Favorites

Monday, May 4, 2009

Word does Math - in tables!


Lots of folk do things like use Word for invoices simply because it's easy to do. When it comes to laying out data for an invoice a table makes a good choice as everything looks very neat.

It is also a good choice because, once your data is in place, you can get Word to do the calculations for you.

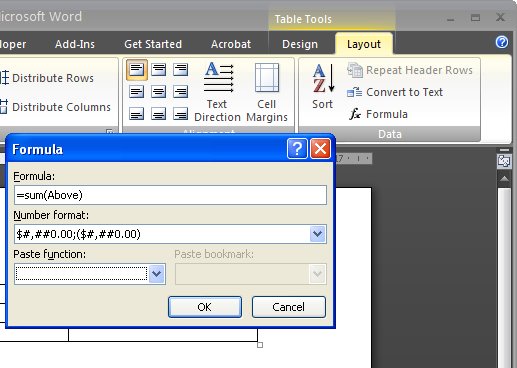
So, for example if a column contains a series of numbers that you want to add up, click in the blank cell at the bottom of the column of numbers and choose Table > Formula (in Word 2007 choose the Table Tools > Layout > Formula button). Make sure the formula reads =sum(above) and click Ok. Now the total is in place in the cell.

If you change the numbers in the cells above, you'll need to recalculate the formula. To do this, click in the cell containing the formula and press F9.

The Table Formula dialog also includes an option for formatting the numerical result so it looks the way you want it to - with numbers after the decimal point and even a leading $ or £ symbol.

Labels: , , , ,

Add to Technorati Favorites

Wednesday, April 22, 2009

Word 2003 - Disable the Insert key

If you still use Word 2003 or earlier you're at risk of Word suddenly taking off and gobbling up text as you type. The problem is that the Insert key toggles insert/overtype mode and if you press it by accident you can end up in overtype mode so everything you type just replaces something else! Yikes it can be frustrating.

Now, Microsoft solved the problem in Word 2007 by disabling the Insert key so it no longer switches into overtype mode any more. That annoys some folks so I wrote a post here about fixing it so it goes back to its old behaviour. But this post is for hapless Word 2003 users and I'll show you how to disable the Insert key so it won't switch into overtype mode. The solution only affects Word so your other programs work as expected.

To disable your Insert key, choose Tools > Customize and click the Keyboard button. Scroll to find the All Commands category and scroll the Commands list to locate the Cancel option. In the Press new shortcut key box click once and then press the Insert key. Click Assign and then Close. This assigns the Insert key to the Cancel command so that it no longer operates OverType mode.

If you ever need to use OverType mode, double click the OVR indicator in the status bar to enable or disable it.

Labels: , , ,

Add to Technorati Favorites

Thursday, April 16, 2009

Send to PowerPoint missing? Not really!


In Word 2003 you could create an outline in Word and then send it to PowerPoint where it would be converted to a PowerPoint slide show. Level 1 became the slide title and level 2 the first level bullet points and so on.

I hear a lot of grumbling that this feature has been removed from Office 2007 – not so! It just isn’t quite where you expect it to be. In fact, you have a few options in PowerPoint 2007 and Word 2007.

Option 1
You can add the Send to PowerPoint button to the Word 2007 Quick Access toolbar by clicking the Office button and choose Word Options > Customize and from the Commands not in Ribbon collection choose the Send to Microsoft Office PowerPoint option and click Add to add it and then Ok. Now you can click it to send the outline file to PowerPoint.

Option 2
You can also approach the task from PowerPoint 2007 which is really the better option. One alternative is to open the Word outline file in PowerPoint and the slides will be automatically created for you. To do this click the Office button and choose Open and from the Files of type list choose All Files so you can see and open your Word file.

Option 3
This is my fave!

Open PowerPoint 2007 with a new slide show and make sure your Word 2007 outline file is closed.

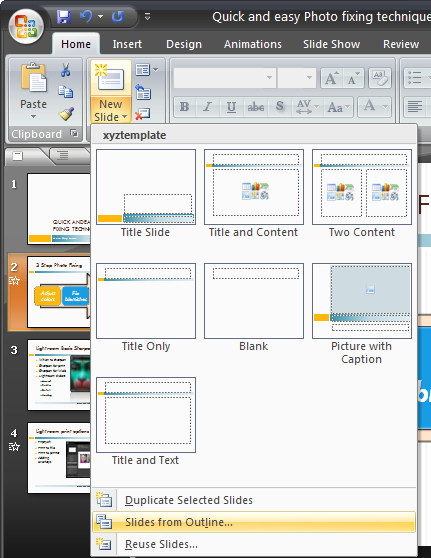
Choose the Home tab on the Ribbon and click the little arrow on the New Slide button. This opens a menu which includes the option Slides from Outline – select this and open your Word 2007 outline file. The slides are automatically created for you.

So, the option to Send to PowerPoint is not there in Word 2007 but you have so many more ways to complete the task now.

Labels: , , , ,

Add to Technorati Favorites

Thursday, April 9, 2009

Cool Word 2003 and 2007 Breakout Boxes


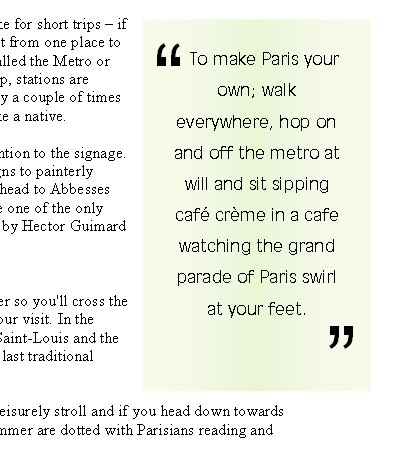
Breakout boxes or pull quotes are a great way to add visual variety to a very text heavy document. Even if you don't have images you can use you can still add some color and interest to the page. To do this, you will need some text to use – ideally it will be an interesting quote or sentence or two from the document itself. You will copy this so it appears in the correct position in the text but so it is also a feature element on the page.

Create a textbox
Start by selecting and copying the text. Click outside the text so it is no longer selected and choose Insert > Text box and draw a textbox on the page. Click inside it and choose Edit > Paste to paste in the text on the clipboard.

Format the text
Text in a breakout box looks better if it is formatted differently to the surrounding document, for example you may want to center it, change the font and adjust the line spacing to double line spacing so that the text looks very different.

Format the text box
You can add a colored background behind the textbox by selecting the textbox and choose Format > Textbox and from the Colors and Lines tab select a Fill Color for the textbox. To remove the border line, choose Line Color > No Line (or choose a line option that you like), and click Ok.

Add quote marks
Adding an oversize pair of quotation marks helps delineate the breakout box or pull quote from the remainder of the document. In this instance it’s best to place the oversize quotation marks each in a separate textbox, format them so they are very large, set the textbox so that the fill color is set to No Fill and the line color to No Line and then drag it into position over the textbox that contains the breakout text.

Set the wrapping
If you set this small textbox’s wrapping to in front of text the text will not be forced to wrap around it and the textbox with the pull quote will control the wrapping not the double quote marks. Format the double quote marks in an interesting font that has an attractive shape for the quotes so that you create an interesting effect.

Labels: , , , , ,

Add to Technorati Favorites

Tuesday, March 10, 2009

Instant text boxes in Microsoft Word


Just a short tip today, I just tripped over this and thought "WOW! I didn't know that!" so I wonder if you know it too?

Ok.. step back a bit. I'm doing a column on columns in Word and I'm showing how to place a text box or image in a document laid out in 2 columns so the text box or image travels with the text and how to take it out of the line of text so it floats independently.

To create the text box, I select my text, then realize I need to create the text box first and click the Text box button without deselecting the text. [insert WOW moment in here].

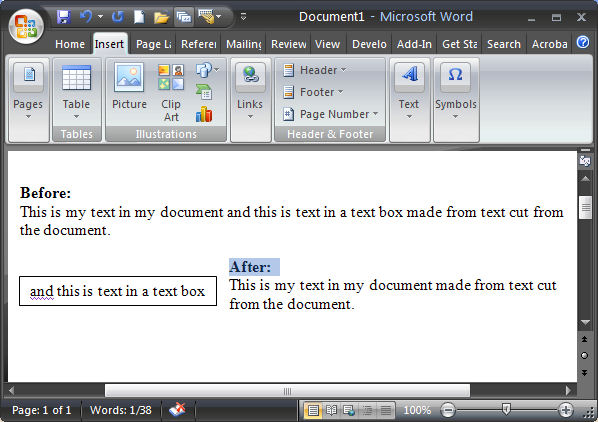
What happened was that the text box got created automatically and the selected text appears inside it - just like that - how cool is that?

So, next time, instead of creating a text box and then copying and pasting text into it, select the text and click the Text Box button on the Drawing toolbar in Word 2003 and earlier and it will all be done automatically for you in one smooth step. The same process works in Word 2007 too but you must click the Insert tab, click the Text box button and choose Draw Text Box for it to happen.

Instant text in text boxes in Microsoft Word - can't ask for anything more simple than that.

Labels: , , , , ,

Add to Technorati Favorites

Monday, March 2, 2009

Protect part of a Word document


You know when it happens. You're developing a template or document for someone to work on and you know that they will clobber part of it when you least expect it. So, you want to protect this from happening and make sure your document never gets destroyed.

Problem is how to do it?

Solution? Read on..

Ok.. so, Word has a document protection feature you can use but it only protects the whole document. But, it can be tweaked to protect only part - but we have to set it up to work this way. So, you have to add section breaks around the area to protect. Pretty easy to do. Click just above where the protection is to start and choose Insert > Break > Continuous - this adds a continuous section break in at this point and, because it's continuous there isn't really any indication it's there.

Move to just beyond the area to protect and repeat to add another continuous section break. If you just want to protect the beginning or end of your document you only need one section break.

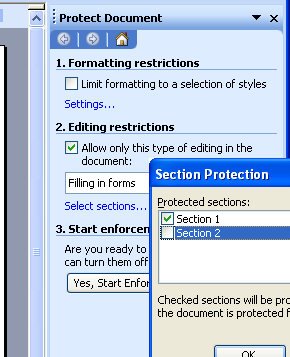
So far, so good. Now for the protection bit. Choose Tools > Protect Document and in the Editing Restrictions area, click the checkbox and from the list choose Filling in Forms. Now click Select Sections and check the sections to protect (ie leave the ones you want to be able to edit unchecked).

Then click Yes, Start Enforcing Protection and, if desired, add a password.

Now users are locked out of the protected area of the document and they can't change it.

In Word 2007 it works just the same. Find the section breaks in Page Layout > Breaks > Continuous and the protection tool in Review > Protect Document > Restrict Formatting and Editing.

Neat huh?

Labels: , , , ,

Add to Technorati Favorites

Thursday, March 13, 2008

Zap those hyperlinks


When you copy and paste text from the web into a Word document, typically the hyperlinks come too. If you don't want them - if blue underlined nonsense peppering your text offends your sensibilities (as it does mine) - here are some thoughts for removing hyperlink formatting from your text.

One option is to select the link and choose Insert > Hyperlink (or press Control + K) and click the Remove Link button in the dialog. That's the hard way in my book.

Easier still is to select the text and just press Control + Spacebar. That strips the formatting from the text - leaving it as plain text. It also works to strip formatting from any text, a handy shortcut to know.

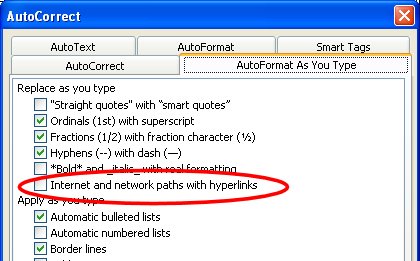
Now, if you get hyperlinks whenever you type a URL or email address you can stop this from happening by choosing Tools > AutoCorrect Options > AutoFormat as you Type tab and disable the Internet and network paths with hyperlinks option. Now you can type all you like and the AutoFormat won't affect your text.

Labels: , ,

Add to Technorati Favorites

Monday, March 3, 2008

MIA - Word 2007 loses Versions


There was a handy utility in Word prior to and including Word 2003 which disappeared without ceremony in Word 2007 called Versions. The premise was that you could save multiple versions of a document - like a snapshot of the document at different stages of its development - inside the one file. The document took with it a history of what it had looked like at various times in its past. To use it, choose File > Versions and then just save a version now or set it to save one automatically each time you close a file.

If you didn't use versioning, you may not mourn its passing. If you did use it you are left wondering why it got axed. It was a handy tool, it worked, it did a job that meant many folk who might otherwise have lost work permanently actually had the backups of their work on hand when they needed it. Nice work Microsoft - NOT!

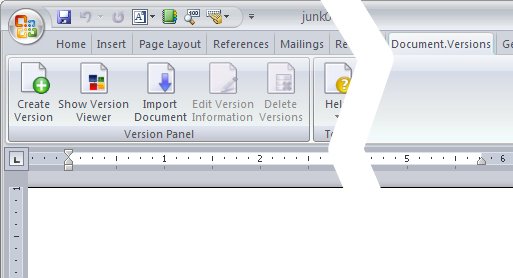
Anyway the clever folk at Edenic Software have created a neat little add-in which puts Versions back into Microsoft Word. The tool is called Document.Versions and it installs as a new Ribbon entry. It works pretty much like the old tool but this one is nice and visible and made by folks who care so it's likely to be around for quite some time. I've been trialling a Beta version and the final release is out very soon.

If you loved versions and if you're annoyed (I'm trying to be polite here) that Microsoft took away a great tool, then take yourself over to OfficeVersions.com and grab a trial version of the add-in. You can trial it for 30 days and then buy a licence for less than it will cost in your time to get back information you've lost when someone edits your document without turning on Tracked Changes, for example!

Oh, and look out for other .Version tools coming soon. Versions add-ins for Excel and PowerPoint are planned - called Spreadsheet.Versions and Slideshow.Versions. While versioning was never a feature of either Excel or PowerPoint that doesn't mean these won't be very handy additions to Excel 2007 and PowerPoint 2007 too.

Labels: , , ,

Add to Technorati Favorites

Monday, January 14, 2008

Setting tabs in Word

If you only ever use the toolbars in Word you are missing out on a lot of functionality. One thing you can't do using the toolbar that you can do with menus is to set a dot leader tab.

Choose Format > Tabs and not only can you select the type of tab and its exact position on the ruler but you can select from one of four leader styles. These leader characters appear before the tab stop, so they extend from the last character on the line to the tab position and they are the tool to use when creating lines for users to handwrite text into, for example.

Labels: , , ,

Add to Technorati Favorites

Wednesday, December 5, 2007

Images in Word tables

It is possible to place an image inside a table cell in Word. To do this, first create a table, click inside the cell and then choose Insert Picture > From File and select the image to insert. You can size the image inside the table cell as requiredby dragging on its sizing handles.

If you set the image's Text Wrapping to Behind Text or In Front of Text the image will no longer be constrained to the table and will jump out of it and operate independently of it. To wrap text around the image inside the table cell use the Square or Tight options for best results. In Line With Text only wraps one line and it's pretty awful.

Labels: , , ,

Add to Technorati Favorites

Thursday, November 29, 2007

Help!? WTF?


First up today, a pet peeve of mine. Why do folks head up emails with Help! or Information wanted? It's so damn inconventient to have to open an email just to know you can't help. Is it so difficult to say, Chart formatting issue or Contact details for XYZ needed? Obviously it is for some people. Sheesh!

Ok, rant over.

Problem: What do you do if a macro won't run. You've opened a file with a macro in it and you go to run it and nothing happens? Problem is, most likely, that your copy of Word is configured so you can't run macros. It's a security thing but it's no good if you need to run the macro is it?

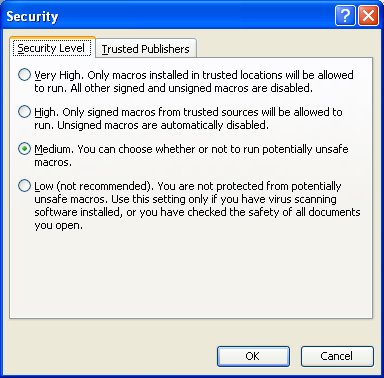
Solution: Choose Tools > Options > Security, Macro Security and select an option that will let you run macros - go for the most secure option which still lets you do your work. Close and reopen the document and try again. Interestingly enough you might encounter this problem as you're developing your macros. Word lets you create macros by may not let you actually run them.

Labels: ,

Add to Technorati Favorites

Tuesday, October 30, 2007

Making Columns in Word

There are lots of ways to create text in columns in Word but the easiest is to type the text (or at least some of it) and select it or position the cursor where the columns should begin. Then choose Format, Columns and select the number and spacing of columns.

From the Apply To dropdown list choose what to apply the columns to. If you have text selected, you'll typically select Selected text. If you haven't selected text you can apply them to the Whole Document or This Point Forward. Using This Point Forward lets you create a heading on the page with the text in columns under it.

Labels: , ,

Add to Technorati Favorites

Sunday, October 21, 2007

Image Autoentry - Word 2003

If there is an image that you typically use in a document such as your company logo you can create it so that it can be automatically inserted into your documents.

To start, first place the image into the document and size it and format it to suit your needs - this will include setting its Text Wrapping properties.

Now select the image and choose Insert > AutoText > New and type a descriptive word to describe the image such as logo. Click Ok.

In future, type the word logo and press F3 and the image will automatically appear in the document. This saves you from having to insert it and format it manually each time you need it. It's a big time saver.

Labels: , ,

Add to Technorati Favorites

Tuesday, October 9, 2007

Quickie calculations in Word 2003

Older versions of Word included a Calculate option on the Tools menu which let you make quick calculations.

If you're using Word 2003 you can add the tool back by right clicking any toolbar and choose Customize. Select the Commands tab and, from the Categories list choose All Commands and scroll the Commands list to locate ToolsCalculate. Drag this onto the Tools menu and hold your mouse there until the menu opens and then drop the option into place. If desired, right click the new entry and remove the word Tools from its name so it simply reads Calculate.

Now test your new menu item by typing some values eg 24, 25 & 26 and select them. Choose Tools, Calculate and the status bar will display "The result of the calculation is 75". If you later click Control + V you can paste the result of the calculation (75) into your document.

To sum a column of numbers, hold Alt as you drag over the column with your mouse then choose Tools, Calculate. It also works inside tables and you can type a more detailed calculations such as 25*25 and it will calculate the result for you (answer: 625)

So, put away the calculator and let Word to the work for you.

Labels: ,

Add to Technorati Favorites

Friday, October 5, 2007

Toolbar buttons..

Last post I showed you how you can compress the font in a document to give it a classier look. Today, now that you have the font compression value sorted out, I'll show you how to make a toolbar button for it so you can apply it with a single click.

Right click any toolbar in Word 2003 or earlier and choose Customize then select the Commands tab and, from the Categories list choose All Commands. Scroll to locate the Condensed: item and click it. At the foot of the dialog a box appears from which you can select a point size to adjust to, for example, if you use 0.3 pt the type that. Now drag the Condensed option onto the toolbar and close the Customize dialog.

In future to condense your type, select it and click your toolbar button.

Labels: , ,

Add to Technorati Favorites

Wednesday, October 3, 2007

Smaller and better looking fonts

When you're writing newsletters, company reports and other documents in Word you may find that they look more professional if you condense your font slightly. Even a reduction as small as .3 points changes the look of the font significantly and makes it look, well just a little more classy.

To do this, select the text to alter and choose Format, Font, Character Spacing tab and set the Spacing to Condensed and the By value to, say, .3 points.

If it's too tight, loosen it up a bit, if not, try a little more compression until you get something you like.

Labels: , ,

Add to Technorati Favorites

Wednesday, September 19, 2007

Formatting table cells in Word


Since Microsoft Word 2002, it has been possible to format a series of cells in a table all at the one time, even if they are not contiguous (a lovely word that means not side-by-side).

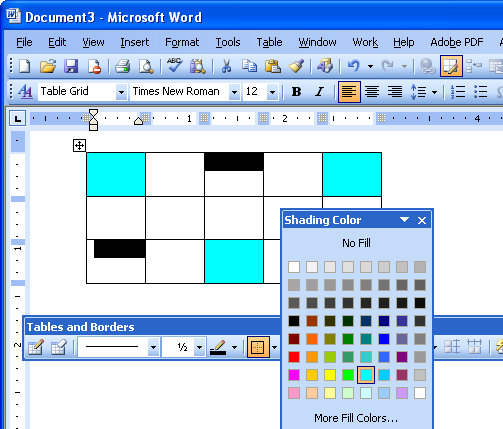
To do this, select the first cell then Control + click on the other cells that you want to share the same formatting. Once all the cells are selected you can apply a formatting such as a shading to those cells. Note, that the Shading button on the Tables and Borders toolbar in Word 2002/2003 is the one to use, the one on the Drawing toolbar is the Fill button - it looks the same but doesn't work the same!

Selecting and formatting non contiguous cells all at ones makes it a quicker process to format a table than it would be if you selected and formatted each cell individually.

However, of course, the F4 key still works in cells in a table so you can, for example, fill a cell with a shading color or a format option and then click in another cell and press the F4 key and have that format applied to this cell too. The F4 key is a repeat key which repeats the previous command and it's a great key to learn to use anytime you're working with Word.

Labels: , , ,

Add to Technorati Favorites

Tuesday, September 11, 2007

Watch your language!


I write for magazines and online providers all across the world. One day, I'm typing a Canadian article, another an Australian one and later in the week my work gets sent off to the UK and the USA. I'm constantly juggling color/colour, labor/labour and tricky ones like jewelry/jewellery. It's confusing to say the least and the last thing I want to do is to miss obvious misspellings. That's why I rely on Word's language tools.

Prior to Word 2007 I can set the language for a document by selecting it and choose Tools, Language, Set Language and choose the proofing language.

In Word 2007, of course, everything is different but it's easy to find - thank you Microsoft!

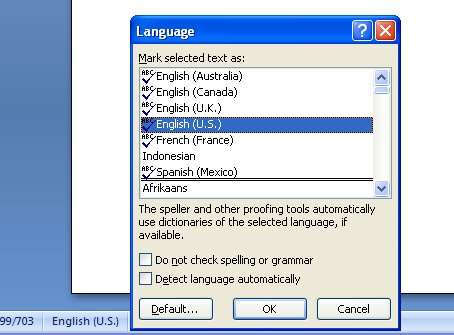
In Word 2007, select your document (Control + A works just fine) and click the language indicator on the Status bar - the Language dialog appears and you can choose the language to use to proof the text.

Labels: , ,

Add to Technorati Favorites

Thursday, August 2, 2007

Print in Reverse - Word


Are you one of those people who print long documents in Word and then spend a few mintues reversing the page order because they come out printed back to front? Or do you print multiple copies of a document and then have to collate them by hand?

If you are, it's probably cause you haven't read this blog post! You see, life doesn't have to be this difficult. Word will collate for you and it will print in the order you want and if it's not doing it right you can change it.

First things first, if you need to reverse your print order, choose Tools, Options, Print and change the setting in the Reverse Print Order checkbox - if it is checked, uncheck it and if it is clear then check it. This setting remains for all documents so now you don't have to shuffle paper any more.

The collating options are in the printing dialog. Choose File, Print and you can click to set one of two collating options for multiple prints.

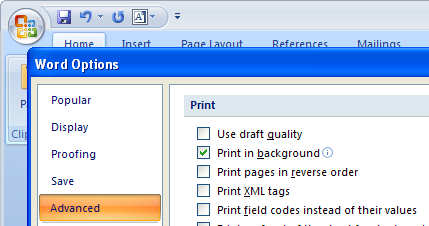
In Word 2007, find the print options by clicking the Office button, choose Word Options, Advanced and scroll down to locate the Print options.

Labels: , , ,

Add to Technorati Favorites